
This article goes behind the scenes of HEAR IT: I Am for an Art. If you haven’t seen it yet, here it is.
A few years ago we started SEE IT, a series of visual interviews with photographers. The concept is simple: you get a few questions from us and respond with your photographs and nothing else. It has been an incredibly insightful experience. Connecting with visual storytellers from all around the world has not only been inspiring but has also let us dive deeper behind the scenes of the creative process. The last year has been a transformative time for our collective, as we crystallised our vision and goals for the future: building a bridge of communication and understanding between artists and programmers, visual storytellers and musicians, filmmakers and illustrators. One of the ideas we hold dear is HEAR IT, the next in our series of series: a format that allows for a creative approach to interviewing bands and building a deeper bond with artists who work primarily with sound.
The trick at the beginning is to figure out the most efficient way to convey your idea to others. One can carry around an idea that seems clearly formulated, but more often than not, attempts at passing that idea from one mind to another are just that: a sea of attempts. Fortunately, a collective process demands involving others. One of my childhood friends happens to be a musician, currently working on a project with his father, a well-known Polish saxophonist and jazz virtuoso. When I heard they were playing at a Scottish-Polish mini festival in Aberdeen, it became clear this was the perfect opportunity to collaborate.
And so, along with Finbarr, we grabbed a few Peli cases full of equipment and flew to Aberdeen. It would be a lie to say we had a concrete plan. Naturally we had some references in mind, be it Tiny Desk sessions or Vulfpeck, but we knew little about the venue itself or how much control we would have over the lighting or the look of the stage. We were prepared for everything and nothing. Fortunately, in the weeks leading up to the event we had a few conversations with the band, and they reassured us the sound engineering would be on point. When we got there, the musicians were getting ready. As predicted, the little flexibility we were left with meant feeling our way into the performance and capturing it impromptu.
As guests started pouring in, the room filled with an atmosphere of sheer curiosity. There are no better conditions for a jazz performance than a room full of curious folk. Throughout the concert one could sense being on the verge of the unknown, as it should be. And at one point, as it should be, we stepped over that edge. Mikołaj, the vocalist, began to revive Claes Oldenburg’s 1961 statement “I Am for an Art”. The words glided gently over the stage, by means of passion and deep devotion blurring the outlines of the self, the moment and the meaning of it all.
As each moment pushed us deeper into the night, by 2AM we found ourselves at the Tangleha Artists Collective, 40 miles south of Aberdeen, in the very heart of a hippie community. While only a few of them had been at the gig, everyone was in a similar trance-like state. An open mic welcomed anyone to join on stage and pour out whatever depths of their soul they wished. Naturally, our Polish musicians took the opportunity to venture even further into the darkness of the unknown.
It was at one point during that night that I realised the potential of the initial idea. The fantastically expressive hippies of the Tangleha community let me distance myself from the corporate pursuit. Being away from London’s rat race brought a transient moment of clarity. The carousel of life will never stop spinning; if one has the privilege to take a step back and enjoy the view, that privilege quickly turns into a responsibility. What fun! And so we shall keep building bridges of self-expression with those outside our comfort zone, creating meaningful connections and lasting friendships.
Friends at Tangleha, thank you. You revitalised my spirit with the wonderful chaos of that night.
We left Scotland the next day, but it won’t be long before we’re back. There is something to be said for the warmth and hospitality we received, something one can easily forget living in London. My time in Wales and Scotland made me realise how much more there is to these islands. I urge you to visit places other than the capitals: that way you will undoubtedly discover the raw spirit of the people. Aberdeen was nothing short of fascinating, and we left regretting that we couldn’t take in more of it.
For those interested in places that cultivate permaculture, the Tangleha Artists Collective website lives on in the Internet Archive.

Breakdown
A few days later I was reviewing the footage on the train from London to Cardiff, where I was stationed at the time, working as a digital imaging technician on TV shows. Years of working as a DIT had naturally pointed me towards understanding the relationship between data signals and their translation into the images we all relate to. As that turned into my profession, the creative spirit within guided me towards less conventional ways to manipulate the image. With recent developments in machine learning bringing us tools such as DAIN and waifu2x, experimenting with them was the least I could do. What follows is a simple account of that process (beware: it might be incredibly boring to anyone who doesn’t care about upscaling, or who sees vectorisation as little more than a fancy Instagram filter).
1. Preparation
The moment I described as blurring the lines of meaning was the one we decided to polish and release. We shot it on two cameras, a BMPCC4K and a BMPCC6K, in BRAW with 8:1 compression at ISO 3200, using a Sigma 18–35mm f/1.8 for the wide and a Sigma 50–100mm f/1.8 for the close-up. The footage was brought into Resolve, synced with the audio (which meant solving 44.1kHz vs. 48kHz), cut in a multicam setup and refined over a few days. Once the assembly was locked and approved, I did a primary grade and made sure no information was lost (yet). Once that was accepted, I revisited the grade, crushed the blacks a little and added noise reduction before the grade was applied. This was exported as a QuickTime DNxHD RGB 444 safety copy and a separate PNG sequence that would serve as the main source for manipulation.
2. SDfx
This may be a personal fixation, but ever since I saw this post on Reddit a few years ago, I have been hooked on the idea of somewhat replicating the process behind Linklater’s A Scanner Darkly (2006) or Waking Life (2001), without an army of rotoscope animators. I’ve experimented with Ricardo Corin’s software many times, and while it has a long way to go, I was incredibly excited to see he had released a new Mac version (you can check it out here).
Now, I’m not a huge fan of Apple products, but I recently happened to come into possession of a 2014 Mac mini, which was enough to process 12,000 frames in 17 hours or so. Unfortunately, the software is still at an early stage, and it kept crashing whenever a frame had too little detail in the shadows. This forced me to lower the detail threshold, which lowered the resolution (around 720p instead of 1080p). For single frames, the vectorisation preset allows SVG export; sadly this isn’t yet an option for batch processing, and while I entertained the idea of using a keystroke macro to get there, in the end I figured it would be a bit of overkill. Instead, I turned to another app I’d been meaning to experiment with.
3. waifu2x-caffe
Having spent some time in the wonderfully helpful DAIN community on Discord and the Video2x one on Telegram, I grew confident with these tools over time. Being a digital imaging technician means continually learning about video signals, light and optics as well as file formats, encoding and colour science, all mixed with the practical knowledge of being on set and solidified through a hands-on approach. But let me tell you, there are people out there who are not DITs and yet whose knowledge transcends everything you thought you knew. These people are part of numerous communities spread across Telegram, Reddit and Discord, and it turns out they are some of the nicest people on the planet.
waifu2x-caffe improves the resolution of video and images using deep convolutional neural networks. It was put together by lltcggie on GitHub a few years ago and has mostly been used by anime lovers to upscale their favourite rips from 720p to full HD or even UHD. Combined with DAIN, it is behind those strange high-quality videos on YouTube that turn the familiar look of anime into eerily smooth motion at ridiculously high resolutions. It comes with a few pre-trained models; the one that worked best for me was the Y model.
The final settings behind the result you can see:
Y model / 3.0× upscale (1280×720 to 3840×2160) / denoise level 2 / batch size 256 with split 2 / no TTA
4. EbSynth
While SDfx has presets that allow for smooth motion across neighbouring frames, the vector preset certainly doesn’t. This is where the difference from Linklater’s animations is most obvious: the flicker is artificial, not hand-made. But it has a beauty to it, especially together with the music. As we were working at the same time on another project, Henge’s Mushroom One music video, which heavily relies on EbSynth, I thought it might be a good idea to use a few frames processed with SDfx as keyframes for EbSynth, at least at the beginning, before the music starts. EbSynth is made by a team of lovely people from Prague, Secret Weapons. We have been hooked on it since we first came across it in July 2019.
And so 300 or so frames were processed to get that smooth beginning. There are still issues, and one can see artefacts produced by the software, but luckily this project is so abstract anyway that I decided to let it go. If any DITs are reading this: I am fully aware this is a destructive process, especially working with PNGs. While they are uncompressed, each stage introduces artefacts unique to each piece of software, and we are limited to 8 bits of colour per channel, but this piece is all about degradation. Which is nice for a change: there is a sinister satisfaction in breaking the rules.
5. Lyrics
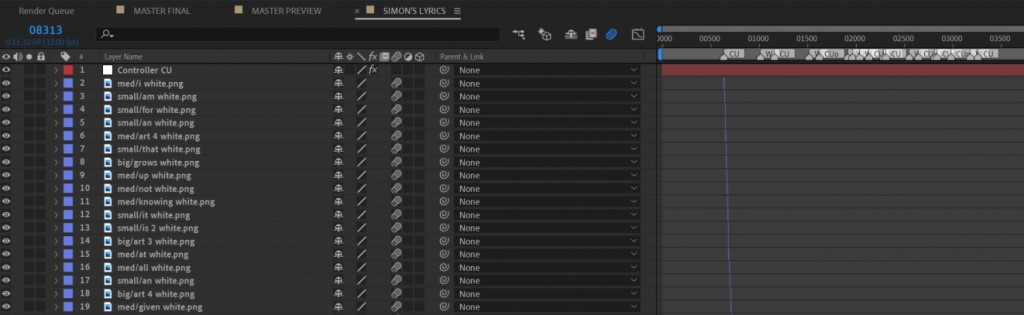
A friend of mine and a member of the collective, Dora Schluttenhofer-Lees, has a brilliant body of work that features a lot of scanning. She has worked on numerous music videos in which her handwriting drives the aesthetic and the overall tone. I asked whether she would be interested in collaborating on this piece, and without a moment’s hesitation she offered to help. She handwrote every word of the lyrics, scanned them and arranged them with timestamps on a timeline in Premiere Pro. The compositions were similar to her previous work, such as BE WHAT I WANNA BE or I FIND IT HARD TO WAKE UP FROM THE GRAVE. On review, I worried there was a bit too much focus on the words, which took away from the performance and from being in the moment, which felt important to what the music speaks of. Recognising that this was down to my brief, I decided to animate the lyrics in After Effects in a way that would make the words feel part of the stage. Once I imported the Premiere Pro project, it became a terrifying prospect: hundreds of keyframes across hundreds of properties, with no way to make changes once they were all there. It was clearly the perfect time to revisit expressions. I wrote a simple set of expressions to animate all the individual layers, which you can find below.
Adobe After Effects 8.0 Keyframe Data

Transform	Scale
Expression Data
wordSize = thisLayer.name.split("/")[0];
sizeCtrl = thisComp.layer("Controller").effect(wordSize)("Slider");
scaleDur = (outPoint - inPoint) / 3;
scaleIn = ease(time,inPoint,inPoint + scaleDur,0,[sizeCtrl, sizeCtrl]);
scaleOut = ease(time,outPoint - scaleDur*2,outPoint,0,[sizeCtrl/2, sizeCtrl/2]);
scaleIn - scaleOut;

End of Expression Data

Transform	Y Position
Expression Data
wordSize = thisLayer.name.split("/")[0];
seedRandom(index,true);
clipDur = timeToFrames(outPoint - inPoint,12);
maxMove = 5000/(thisComp.layer("Controller").effect(wordSize)("Slider"));
startPos = thisComp.layer("Controller").transform.yPosition + random(-20,20);
endPos = thisComp.layer("Controller").transform.yPosition + (random(-(maxMove),maxMove));
easeOut(time,inPoint,outPoint,startPos,endPos);

End of Expression Data

Transform	Rotation
Expression Data
wiggle(6,3)

End of Expression Data

Transform	Opacity
Expression Data
fadeDur = (outPoint - inPoint) / 2;
fadeIn = easeIn(time,inPoint, inPoint + .1,0,100);
fadeOut = ease(time,outPoint - fadeDur,outPoint,0,100);
fadeIn - fadeOut

End of Expression Data

Transform	X Position
Expression Data
seedRandom(index,true);
wordSize = thisLayer.name.split("/")[0];
clipDur = timeToFrames(outPoint - inPoint,12);
startPos = thisComp.layer("Controller").transform.xPosition + random(-30,30);
endPos = thisComp.layer("Controller").transform.xPosition - ((clipDur/2)*(thisComp.layer("Controller").effect(wordSize)("Slider")*4) + random(400,600));
easeOut(time,inPoint,outPoint,startPos,endPos);

End of Expression Data

End of Keyframe Data
Let’s briefly go through the code. I used each layer’s name to link it to a slider on the Controller null. There were three sizes: big, medium and small. clipDur is based on each layer’s duration, so the longer a layer lasts, the further its word travels away from the singer (most layers were of a similar length, but it introduced some variance). Scale and opacity drive the moment each word appears near the mic. X position dictates how far a word travels, while Y position adds a bit of randomness so that the words don’t appear in a line, one after another. Finally, a simple wiggle on rotation makes it less stiff and adds a bit of vibrancy.
6. Compositing
The last stage was to bring it all together, which also allowed for a secondary colour grade. I isolated skin tones to keep them more or less consistent across the piece, and shifted hue and saturation across the whole video to make it look as if the lights were changing during the performance. A little glow here and there, an intro and end credits, a little work with the musicians on mastering the audio, and a trim at the end to get rid of unnecessary fluff. The last thing left to do was to posterise time: what makes the animation feel less artificial is playback at 12 frames per second. This kicks in after the introductory EbSynth sequence (a few keyframes, each output fading into the next), when the SDfx flicker takes over.
Conclusion
Overall, the project developed intuitively and naturally. It took around two days to fly to Aberdeen, shoot and fly back; roughly 48 hours of editing, reviewing and figuring out the pipeline, stretched across four months; and finally 24 hours of SDfx processing, 8 hours of EbSynth processing and 27 hours of upscaling with waifu2x-caffe. In the future we hope to collaborate with all kinds of bands, in a process somewhat analogous to how we featured photographers and their work in the SEE IT series. For now, if you’re interested in chatting more about the process behind this video, do drop us a line.